

“Reports and Dashboards” Review for Associates (4/4)
Reports and Dashboards is the last section of the Salesforce Associate exam. Today, we are going to review the main concepts to help you do reviews before the Associate certification.
This section of the exam is divided into two subsections:
- Describe reports on Salesforce.
- Describe dashboards on Salesforce.
This section covers 15% of the exam, which means you’ll expect to receive around 6 questions about this subject.
This article has been written in question-answer format. I’ll recommend you include these concepts on flashcards and review them constantly.
Reports and Dashboards Part 1: Describe reports on Salesforce
What does a report is?
Is a group of data that meets a set of criteria.
Why use a report?
To get the exact data you need.
How does the access to reports work?
We can control the access to the contents of the folder based on roles, permissions and more.
Who can access reports and dashboards?
Reports and dashboards are stored in folders.
4 types of folders sharing?
- Public
- Private
- Shared with an specific users
- Shared with the entire organization.
With whom a report or dashboard folder can be shared?
- Users
- Groups
- Roles
- Territories
How many reports or dashboard folders can be shared with users, groups, roles or territories?
- 25 from the UI.
- 500 from REST API.
2 Report Limits?
- Maximum of 20 rows for summary reports and matrix reports.
- 50 rows for tabular reports.
How many custom summary formula fields can include a report?
Up to 5.
3 Types of report folders?
- Public.
- Hidden.
- Shared.
What is a report type?
- Like a template that makes reporting easier.
- Determines which fields and records are available for use when creating a report..
2 ways to create a report with related objects?
Use this 2 record types:
- Primary object with related object.
- Primary object with or without related object.
How many related objects can we have in the “with” or “with or without” distinction?
Up to 4 related objects.
5 types of filter reports?
- Standard Filter: By default by most objects.
- Field Filter: Set the field, operator and value.
- Filter Logic: Add a boolean condition to control how field filters are evaluated.
- Cross Filter: Filter a report by the child object using WITH or WITHOUT conditions.
- Row Limit: Select the maximum number of rows to display for tabular reports.
3 types of report formats?
- Tabular
- Summary
- Matrix
3 features of Tabular Reports?
- Use it to make a list.
- Is the simplest.
- Similar to spreadsheets.
3 features of Summary Reports?
- To group and summarize.
- Similar to tabular but can group rows of data, view subtotals and create charts.
- Simulate the GROUP BY.
3 features of Matrix Reports?
- To group and summarize by row and column.
- Are the most time-consuming to set up.
- Provide the most detailed view of our data.
Which report formats are supported in dashboards?
- All of them
Which report formats support report charts and formulas?
- Summary and Matrix.
Which report formats support cross-object formulas?
- None of these.
Reports and Dashboards Part 2: Describe dashboards on Salesforce
What a Dashboard is?
A tool to display report information in graphical layouts as charts.
Why use a Dashboard?
We can customize how data is grouped, summarized, and displayed for each component.
About the date of the data that is shown in a dashboard?
Each dashboard includes a timestamp of the last data refresh.
How does the access to dashboards work?
The data of each dashboard depends on the running user.
What is a Running User?
The user whose security settings determine which data to display in a dashboard.
What is a Dynamic Dashboard?
Are dashboards where the running user is always the logged-in user.
Why to use Dynamic Dashboards?
To choose who people view dashboard data without creating separate dashboards per user.
Which permissions can set an option to preview the dashboard?
Users with the “View my Team’s Dashboards” or “View All Data” permission can preview the dashboard under them in the role hierarchy.
How to set up a Dynamic Dashboard?
- Go to the Properties menu and select “View Dashboard As”.
- There are three options: Me, Another Person, The dashboard viewer.
- Optional: Let the viewers choose whom they view the dashboard as.
What is a Report Chart?
Is a Chart that can be placed at the top of my report.
When to use a Report Chart?
When you don’t want to use a dashboard, but need a chart. You can use a Report Chart.
More Information
- Salesforce Certified Associate: Review Reports and Dashboards
- Reports & Dashboards for Lightning Experience
If you want to learn about the Salesforce Associate Certification, you can go to this post:

“Data Model” Review for Associates (3/4)
Data Model is the third section of the Salesforce Associate exam. We are going to review the main concepts to help you do reviews before the Associate certification.
This section of the exam is divided into three subsections:
- Explain the relationship between the core standard objects (account, contact, lead, opportunity, case).
- Given a scenario, determine which feature to use to ensure data visibility.
- Given a scenario, determine which tool to use to ensure data integrity.
This section covers 25% of the exam, which means you’ll expect to receive 10 questions about this subject.
This article has been written in question-answer format. I’ll recommend you include these concepts on flashcards and review them constantly.
Data Model Part 1: Explain the relationship between the core standard objects (account, contact, lead, opportunity, case)
4 ways to assign leads in Salesforce?
- Create a Lead directly in Salesforce.
- Web-to-Lead form: Collect leads from a website.
- Import leads from a file.
- Assign leads automatically.
Why use the lead workspace?
To track interactions with leads.
5 sections of the Leads Workspace:
- Campaign History: Lead involved in any marketing campaigns.
- Details: Information about the lead.
- Activity
- News
- Chatter
When can I convert a lead?
Once a Lead is qualified, you can convert it.
What happens when a Lead is converted?
Salesforce uses the information stored in the lead, to create a business account, a contact and an opportunity.
What happens to the lead conversion when I enable a person account?
If the lead didn’t include a company name, the lead is converted into a person account.
Recommendation for Leads and Opportunities?
Use Standard naming conventions for leads and opportunities.
You can automate that process by using Flows.
What is an opportunity?
It’s a deal in progress.
5 Default Opportunity Stages?
- Prospecting
- Proposal/Price Quote
- Negotiation/Review
- Closed/Won
- Closed/Lost
What is a Contact Role?
Tell you which contacts you’re dealing with and how they are related to the opportunity.
How do I add Contact Roles to an Opportunity?
In the related list “Contact Roles” we can do it.
Why use Opportunity Teams and Account Teams?
To sell as a team. Helps team members work together and track the opportunity’s progress.
Differences between Opportunity Teams and Account Teams?
- Account team members: Expected a long-term relationship with a customer.
- Opportunity team members: Is a temporary group.
What do I do if I usually work with the same coworkers on opportunities?
- Create a Default Opportunity Team.
- Or you can use Default account teams in opportunities too.
How do I split credit for an opportunity?
Using “Opportunity Splits” to incentivize the team members to complete a deal by sharing credit.
What is an “overlay split” on an opportunity?
Is a way to credit supporting team members.
3 report types to report individual sales credits for the entire team?
- Split Opportunities, Split Opportunities with Products and Split Opportunities with Products and Schedules.
Data Model Part 2: Given a scenario, determine which feature to use to ensure data visibility
What is a Path?
It’s an indicator that helps you visualize where you are and where you’re going in Leads and Opportunities.
What is the Kanban view?
It’s a visual summary of the records in a list view.
Why use the Kanban view?
To give you a big picture view of all your work.
How do I use the Kanban view?
Go to the Opportunity tab / All Oportunities list view / Display as Menu
Why view a Chart of List View Data?
To summarize the data in your list view in different ways.
How do I view a Chart of list view Data?
Click on the chart icon, on the right side, of the Opportunity tab, in the all opportunities list view.
2 reasons to use Dynamic Forms?
- To migrate fields and sections from layout to an individual component in the Lightning App Builder.
- To give the users only the fields and sections they want.
When to use Dynamic Forms?
To create or update basic forms.
5 cases to use Screen Flows with LWC?
- Multi-screen form.
- UX requirements and LWC.
- Cross Objects.
- Additional Logic
- Actions behind the form.
3 Features of a Dynamic Form:
- Instant migration from Page Layouts to Dynamic Forms.
- Visibility Rules.
- Simple organization in the layout.
2 ways to create a dynamic Form:
- From App Builder, we can create a Lightning page and drag fields and sections to the page.
- Existing record pages migrate the records using the migration wizard.
5 Considerations for using dynamic forms:
- Owner and Record Type fields are read-only.
- When you save a new Custom Object with name empty, it saves the Record Id as Name. The Name field should be on the page and should be required.
- Field sections are only available on desktop devices.
- Record Details are only available on Mobile.
- No Record Detail component and field sections on the same page.
6 objects supported by Dynamic Forms?
- Custom Objects
- Account
- Contact
- Lead
- Opportunity
- Cases
3 Limitations of Dynamic Forms?
- It doesn’t work in Internet Explorer.
- Blank spaces aren’t supported.
- Up to 100 fields per column in a Field Section component
3 elements included when we migrate a page to a dynamic form?
- Fields.
- Sections containing fields.
- Layout save options.
Data Model Part 3: Given a scenario, determine which tool to use to ensure data integrity
2 parts of a picklist?
- Field: Type of picklist.
- Value Set: Choices a user sees.
3 Types of Picklist fields?
- Standard: The one that comes with Salesforce.
- Custom: The ones you create in each object.
- Custom Multi-Select
2 Properties of a picklist field?
- Restricted Picklist
- Dependent Picklist
2 reasons to use a Restricted Picklist?
- To Restrict users from adding new values.
- To keep your data consistent.
How do I create a restricted picklist?
Select the “Restrict picklist to the values defined in the value set” option when you create a custom picklist.
Why use a Dependent Picklist?
To improve data integrity by filtering values for one picklist based on a selection from another picklist or a checkbox on the same record.
How do I create a Dependent Picklist?
- Go to Setup / Select your Object / Fields & Relationships / Field Dependencies / New.
- Select the controlling and dependent field.
- Select in the field dependency matrix which dependent picklist values are available when a user selects each controlling field value.
3 ways to define a value on a picklist?
- Set individual values.
- Built-in set of values for the standard picklist.
- Use a Global value set.
What is a global value set?
A custom set of values to share with more than one picklist field.
Picklist vs. Multi-Select Picklist?
- Picklist: One value at a time.
- Multi-select Picklist: One or more values at a time.
How do I offer more than one option to the user in a multi-select picklist?
- Separate the values with a semicolon.
- E.g. Gingerbread;Strawberry;Chocolate.
5 Considerations of picklists?
- We can convert a custom picklist to a multi-select picklist to support multiple values in the field.
- When converting a multi-select picklist to a picklist field that doesn’t support multi-select, Salesforce clears the values for that field and only allows one value.
- To get multi-select picklist data, use contains or includes, not equals.
- In reports and dashboards, multi-select picklist selections are grouped independently.
- Only specific functions can reference multi-select picklists in formulas.
3 things about inactive values in a picklist?
- Inactive values are not showing up in the picklist.
- You can reactive inactive values.
- There is a limit on total combined active and inactive values.
3 things about deleting and replacing values?
- If there is a blank value, it won’t appear in the picklist.
- Deleting a value in a picklist goes to the background job queue. When the job is complete, your picklist is updated and you’re notified by email.
- If you replace a parent value, the picklist dependency on that value is lost.
What do Controlling and dependent fields mean?
There are two types of fields involved in a Dependent Picklist. The controlling field is the one that sets a value, and the dependent field is the one that filters it’s values because of the controlling field.
4 Considerations of a Dependent Picklist?
- Custom picklist fields can be either controlling or dependent fields.
- Standard picklist fields can only be controlling fields.
- Multi-select picklist fields can only be dependent fields.
- Can only use default values for controlling fields.
How do I set a formula for Default Values of a Picklist?
- Under the General Options in the creation/update of a picklist.
Why use Global Value Sets?
To group values that can be used in more than one picklist.
How do I create Global Value Sets?
- Go to Setup / Search for Picklist Value Sets / New
- Fill in the fields needed to create it.
How do I use Global value sets?
- Go to the Object / Create a new Picklist.
- Select: “Use a global value set” and select the Global value set.
2 considerations about Global Value Sets?
- To replace a value, create the new value first. Then click Replace to start the process.
- Deleting a value, goes to the background job queues.
Why promote a Global Value Set?
When we have a default value that can be part of a Global Value Set, we can edit the picklist and use the “Promote a Global Value” button.
Notes Gattered from Simulation Exams
4 ways to control record-level access in Salesforce?
- Organization-wide default
- Role Hierarchy
- Sharing Rules
- Manual Sharing
What is an Organization-wide default?
- Define the default level of access.
What is a Role Hierarchy?
Extend record access to users higher in the hierarchy.
What are the Sharing Rules?
To grant additional record access to certain users or groups of users.
What is Manual Sharing?
Owner of a record to share it with other users. (When you can’t automate or someone is off)
How do I grant access to Objects, Fields and Records?
- Object-level Security: Permission Set and Profile.
- Field-level Security: Permission Set and Profile.
- Record-level security:
- OWD
- Roles
- Sharing Rules
- Manual Sharing
4 types of Organization-wide default access?
- Private
- Public Read only
- Public Read/write
- Controlled by Parent
When should I use a validation rule?
To make a field required when it meets certain criteria.
How do I log- in outside of specific hours?
Login hours
Which feature allows you to create relationships between accounts?
Account Hierarchy
Which type of relationship exists between an Account and a Contact?
Lookup
What is the type of relationship between an Account and a Opportunity?
Master-detail
How many master-detail relationships can an object have?
2
More Information:
- Trailhead: Customize a Salesforce Object
- Custom Fields: Quick Look
- Formulas and Validations
- Trailhead: Data Modeling
- Object Relationships Overview
- Salesforce Certified Associate: Study Up on the Data Model
If you want to learn about the first and the second section of the Salesforce Associate Certification, you can go to this post: Salesforce Ecosystem Review for Associates and The “Navigation” Review for Associates

The “Navigation” Review for Associates (2/4)
Navigation is the second section of the Salesforce Associate exam. Today, we are going to review the main concepts to help you do reviews before the Associate certification.
This section of the exam is divided into two subsections:
- Given a scenario, identify how a user can locate and access necessary information.
- Given a scenario, identify where Salesforce customization takes place.
This section covers 28% of the exam, which means you’ll expect to receive around 11 questions about this subject.
This article has been written in question-answer format. I’ll recommend you include these concepts on flashcards and review them constantly.
Navigation Part 1: Given a scenario, identify how a user can locate and access necessary information
5 key terms of User Settings?
- Usernames: Formatted as email addresses and unique for all organizations.
- User Licenses: Features from Salesforce that a user can access.
- Profiles: Profiles determine what users can do in Salesforce.
- Roles: Roles determine what users can see in Salesforce based on where they are located in the role hierarchy.
- Alias: Short name to identify the user on list pages, reports, or other places
How many multiple users can we create at a time?
Up to 10 users at a time.
Two types of Data Security that Salesforce provides?
- Sharing model: It makes it easy to assign different data sets to different sets of users.
- Security Controls: access at the level of the organization, objects, fields, or individual records.
4 types of Sharing Model?
- Private: Only the record owner and users above can edit, view and report those records.
- Public Read Only: All users can view and report records but not edit them. Only users above can edit.
- Public Read/Write: All users can view, edit and report all records.
- Controlled by Parent: A user can view, edit or delete a record based on whether he or she can perform that same action on the record associated with it.
4 levels to configure the Security Control in Salesforce?
- Organization.
- Objects.
- Fields.
- Records.
How to handle Objects access data?
Using Permission sets we can handle groups of users from create, view, edit and delete any records of an object.
How to handle Fields access data?
Using Field-level security we can restrict access to certain fields, even if the user has access to the object.
4 ways to handle Record access data?
- Organization-wide defaults: Default level of access to records.
- Role Hierarchies: To give access to records by hierarchy.
- Sharing Rules: To make automatic exceptions to organization-wide defaults for a particular group of users.
- Manual Sharing: To share particular records with other users. Are not default.
When to use Sharing Rules?
To give access to punctual users who usually don’t have access to those records.
When should I use Manual Sharing?
Use it in some situations like when someone goes on vacation and needs to delegate the roles to other people.
Navigation Part 2: Given a scenario, identify where Salesforce customization takes place
What is a Tab?
Initial view point to create, edit and view information about an object.
What is Global Search?
Search more records and fields in Salesforce from the header search box. Global search keeps track of which objects you use and how often you use them, and arranges the search results accordingly
What is the Setup?
Is the section to configure Salesforce.
What is a Related List?
Is a list of related child records shown in the parent layout.
What is the App Launcher?
Is the place where all the Salesforce applications are located.
What is the Recycle Bin?
A section of Salesforce to view and restore records.
Notes Gattered from Simulation Exams
How do I add an app to the tab?
Go to the navigation bar by clicking the pencil icon.
Two options for Default Activities View?
- Related Lists
- Activity Timeline.
Which 2 display settings exist?
- Comfy: More spacious extra space between page & labels top.
- Compact: Condensed view with less space.
Where can we create an email signature?
In my Email Settings
How do I share a list view with several users that do not share a role or profile?
Using a Public Group
When to use sharing rules?
To allow greater access for a particular user.
Where can I see an additional field in a custom list view you created?
Select fields to display.
Where can I create a new list view?
Object Tab
How do I make it easy to access a Report in Salesforce?
Using the favorite tool
How do I list records & navigate as needed without navigating away?
Using the split view.
3 access levels you can grant to Reports & Dashboard folders?
- Viewer
- Editor
- Manager
Where do I configure BBC options and email options in Salesforce?
Email Settings
How do I change the “default list view” of an object tab?
Use “pin”
If you are not familiar with some concepts, I’ll recommend you search for more information in the references.
More Information:
- Salesforce Glossary
- Salesforce Certified Associate: Explore Navigation
- Trailhead – Gestión de Usuarios
- Trailhead – Fundamentos de usuario de Salesforce
- Work with Related Lists on Records in Lightning Experience
- Configuración: Vistazo rápido
- Recycle Bin
If you want to learn about the first section of the Salesforce Associate Certification, you can go to this post: Salesforce Ecosystem Review for Associates

“Salesforce Ecosystem” Review for Associates (1/4)
The Salesforce Ecosystem is the first section of the Salesforce Associate exam. Today, we are going to review the main concepts to help you do reviews before the Associate certification.
This section of the exam is divided into four subsections:
- Given a scenario, describe various resources available to learn and apply in-demand Salesforce skills.
- Given a use case, identify which Salesforce Customer 360 product offerings could be used.
- Describe how companies use Salesforce.
- Differentiate between various job roles and career paths in the Salesforce ecosystem.
This section covers 32% of the exam, which means you’ll expect to receive 13 questions about this subject.
This article has been written in question-answer format. I’ll recommend you include these concepts on flashcards and review them constantly.
Given a scenario, describe various resources available to learn and apply in-demand Salesforce skills.
Which 3 Resources are available to learn Salesforce skills?
- Trailhead
- Trailhead Academy
- Trailblazer Community Group
4 Benefits of Trailhead?
- Helps you gain new technology, business, and soft skills.
- Trailhead helps you learn in-demand skills.
- With Trailhead, you’ll earn resume-worthy credentials.
- Also, you can connect with a community of Trailblazers for mentorship and career opportunities.
Why use Trailhead Academy?
Companies need to skill up their employees quickly and invest in growing their teams’ careers.
4 Benefits of Trailhead Academy?
- Empower your employees with high-touch, instructor-led learning.
- Grow and validate skills with Salesforce credentials.
- Supercharge your employees’ paths to certification with Trailhead Virtual Bootcamps.
- Give your employees’ the ultimate in-person learning experience with Trailblazer Bootcamps.
3 Benefits of the Trailblazer Community?
- Helps you learn relevant skills
- To connect with other Trailblazers
- To give back knowledge
What does TDX mean?
Trailblazer Dx
Where can I post and vote for Salesforce enhancements?
Idea Exchange
Where can I post Salesforce questions?
In the “Questions” section of the Salesforce Trailblazer Community
2 types of credentials in Salesforce?
- Superbadges
- Certifications
2 hands-on organization to practice Salesforce skills?
- Trailhead playground.
- Production Org.
Given a use case, identify which Salesforce Customer 360 product offerings could be used
What is Customer 360?
Customer 360 will put the user in the middle of everything the companies do. Give him the tools to do his job at high performance.
Why choose Salesforce?
That increases collaboration and alignment among all your teams, which leads to lower costs, increased productivity, and efficient growth by exceeding customer expectations.
5 Customer 360 Departments?
- Marketing: It helps the marketing team.
- Sales: Go through the funnel path of sales.
- Commerce: Personalized shopping experiences.
- Service: Support for the client (Mobile, email, Slack, etc.)
- IT: Behind the scenes, collecting and using data for a better customer experience.
8 Salesforce Customer 360 Products?
- Tableau: For Analytics.
- MuleSoft: To integrate external systems.
- Platform: Salesforce Platform.
- Slack: To connect teams, apps, and partners.
- Net Zero: Sostenibilidad
- Industries: Work with solutions designed for their specific industry, like Financial Services Cloud, Health Cloud, Consumer Goods Cloud, and more.
- Partners: AppExchange
- Success: Delivery Success Managers.
6 features of the nonprofit cloud?
- Fundraising.
- Grant-making.
- Program Management.
- Marketing.
- Engagement.
- 10 first subs are free.
Meaning of CPQ?
- Configure
- Price
- Quote
Why use Service Cloud?
To assist customer support team. (Email, chat or phone)
Which Object frequently uses the service cloud?
Cases
Why use Experience Cloud?
To create portals, forums, websites, etc.
Describe how companies use Salesforce
4 Components of the Salesforce Architecture?
- Series of layers.
- Cloud Company.
- Metadata and services.
- Everything is integrated.
What is Multitenant?
Same resources, own space.
What is Metadata?
Data of data.
What is an instance of Salesforce?
Is the specific server cluster that your version of Salesforce is hosted on.
3 types of instances of Salesforce?
- First-Party Infrastructure: Owned and operated by Salesforce.
- Public Cloud Infrastructure: Hosted on Salesforce-managed AWS.
- Hyperforce Infrastructure: Hosted on Salesforce-managed AWS.
3 ways to find our instance of Salesforce?
- Setup / Company Information.
- By the URL (If not MyDomain enabled)
- By searching for your domain directly on “Trust Status (Salesforce.com)”
Why is it important to know about my Salesforce instance?
To see when the next Salesforce release is coming my way. In addition, to properly managing the Salesforce release schedule three times a year.
What does a SaaS mean?
Software as a Service
What is SaaS?
Cloud computing type sold on a subscription. Hosted and provided by the Internet.
What is imperative programming?
Develop using code.
3 Salesforce Releases per year?
- Winter
- Spring
- Summer
5 core values of Salesforce?
- Trust
- Customer Success
- Innovation
- Equality
- Sustainability
Where to find real-time info on system performance and security for Salesforce orgs?
- trust.salesforce.com
Differentiate between various job roles and career paths in the Salesforce ecosystem
4 non-technical Roles of Salesforce?
- Sales Professionals
- Marketing Manager.
- UI/UX Designer
- Human Resource Manager.
4 technical roles of Salesforce?
- Software Developers
- Data Scientist
- Product Manager: Produce all the needed to create a product.
- Technical Writer: Create clear instructions on how to use software.
10 Salesforce Career Paths?
- Salesforce Admin, Developer, Consultant and Designer
- Business Analyst
- Cybersecurity, Marketing, Sales and Service Careers
Name of the Salesforce professional that focuses on UI/UX?
User experience designer
Name of companies that provide apps or consulting services?
Partners
What are the roles and responsibilities of a Business Analyst?
- Understand what people need from the tools of tech?
- Write US
- Req. Acceptance
- Business process map
- Keep documentation up to date.
If you are not familiar with some concepts, I’ll recommend you search for more information in the references.
More Information:
- Trailhead – Learn About the Salesforce Ecosystem
- Trailhead – Salesforce Platform Basics
- AppExchange Basics
- Trailhead – Customer 360 Guides: Quick Look
If you want to learn more about Salesforce, go to this article.

Roll-Up Summary Field in Salesforce
Roll-up Summary Field is a type of custom field on the parent record in master-detail relationships. In addition, use it to display calculations based on the child records related to the master. The functions that can be done with roll-up fields are: Count, Sum, Min and Max.
Details of Roll-Up Summary Field
- Can only be created on the master object in a master-detail relationship.
- Create them on specific standard relationships, such as Opportunity-Product and Account-Opportunity.
- Also, there is a max limitation of 25 roll-up fields per object.
- Not available neither on lookup relationships or formula fields.
- In addition, use them in custom fields to page layouts, views or reports.
- Calculate the Sum, Min, Max value or Record Count of a field.
Capabilities
- Are read-only fields that calculate summary data without code.
- Number, currency and percent fields are available for the SUM calculations.
- Number, currency, percent, date, date/time fields are available for MIN or MAX calculations.
- COUNT simply displays a record count.
- In addition, can include a filter criteria.
Implications of Roll-Up Summary Field
- If there is a roll-up summary field in master-detail, it can’t be converted into a lookup relationship.
- Also, roll-up fields are not available for mapping lead fields of converted leads.
- Can’t summarize Autonumber fields in this type of fields.
- It’s not possible to use a roll-up field as the Error Location field in a validation rule.
For More Information
If you want to learn more about this subject, here are some recomendations: Data Model & Formula Fields in Salesforce.

Advanced Data Model in Salesforce
Advanced Data Model in Salesforce is related to external Ids, external relationships and hierarchical relationships. As we reviewed in the previous post Data Model in Salesforce, Data Model is a collection of objects related each other to represent our data in the Salesforce Database. Now we are going to see more advance information about this subject.
External IDs
- Fields that contain a unique identifier from a system outside of Salesforce.
- Created with the Unique ID setting. That way, External Id values are unique to each record inside Salesforce.
- Limit can be up to 25 External ID fields on an object.
- The field type must be number, text or email.
- Are searchable in Salesforce.
External Relationships
External Lookup
- Allows linking a Salesforce object with a parent external object.
- It’s used to allows referencing data outside of the Salesforce organization.
- External object field values come from an external data source.
Indirect Lookup
- Links a child external object with a parent standard or custom object from Salesforce.
- Needs a custom unique external ID field on the parent object.
- The external column name and a unique external id field are used for matching and associating the records.
Implications of External and Indirect Lookup Relationships
- External and Indirect lookup relationships are available for external objects.
- Related list of child external objects could be impacted if the external systems availability is impacted.
- Lookup searches are not available for both lookups.
- Cross-filters are not supported in reports.
Hierarchical Relationships
- Can be defined on the User object to allow relating one user to another.
- For example, you can create a user related to their boss’ user with hierarchical relationship.
More Information of Advanced Data Model
- Introducing Relationships
- Create Object Relationships
- Report Considerations for Salesforce Connect—All Adapters
- Considerations for Relationships
If you miss the post about Data Model in Salesforce you can go there clicking here.

Data Model in Salesforce
Data Model in Salesforce can represent a collection of objects and fields in an app and how they are related to one another. That means, it can be created using Standard Objects, custom objects and relationships.
Creating a Data Model in Salesforce
- Is a way to represent data in a database consisting of tables with columns and rows.
- Objects represent the tables, fields represent the columns, and records represent rows in Salesforce.
- Standard Objects can be: Account, Contact, Case and Opportunity (Sales Objects Diagram)
- Custom Objects are used to store specific information about the company’s requirement.
- We can set up different relationship types such as lookup and master-detail.
- We can use Schema Builder for viewing and setting up the data model of our organization.
Choosing a Data Model in Salesforce
- A data model is typically created for a custom application in Salesforce.
- Business objects are provided by Salesforce, which means that custom objects are not required for them.
- The type of relationships depends on factors such as object type, security and deletion.
- Before create an object or field ask yourself: Does Salesforce provides us an object or field to handle this information? If not, create a custom object or field.
Types of Relationships
Lookup Relationships
- To link two objects together loosely, that means, without depends each other.
- Don’t have an effect on security or deletion.
- Can be required or optional in the field definition.
- Records of the child object can appear in a related list on the parent record.
- A lookup relationship field can be used to link an object with itself.
Master-Detail Relationships
- To link two objects together closely, it means that they depends each other.
- Deleting a parent record automatically deletes the child record.
- The child record inherit the sharing and security settings of the parent record.
- Can be defined between two custom objects, or a standard object and a custom object, where the standard object is the parent.
- A master-detail relationship field is always required on the detail record.
- Child records can appear in a related list on the parent record.
- Roll-up summary fields can be created on the parent object to summarize the child record.
Many-to-Many Relationships
- To link each record of an object to multiple records of another object and vice versa.
- A custom junction object is created with two master-detail relationships.
- Access to a junction object record is determined by a user’s sharing access to both master records.
- Junction object records are deleted when either associated master record is deleted.
- Roll-up summary fields can be created on both master objects to summarize data from the junction object.
Impact of Modifying Objects and Fields
- A custom object referenced in Apex or Visualforce cannot be deleted.
- The label of an object or field can be renamed even if its referenced by Apex.
- If a schema relationship is modified, Apex code that referes the relationship needs to be updated.
Impact of Field Modifications
- A custom field that is referenced in Apex cannot be deleted. A new temporary field can be created and the referenced field in Apex can be replaced with the temporary field.
- Data type of a custom field referenced by Apex or Visualforce cannot be changed.
- Any modification to a field from Salesforce can have impact on the Apex code that references the field.
- If new value is added to a picklist field, the logic used in Apex code may be updated.
- Modifying the lenght or decimal place of a field may cause data loss.
- If the value of a required field is not specified in Apex, it causes an error.
- If a roll-up summary field is modified, it can change the output of any Apex code.
Custom Settings
- Are similar to custom objects and can be queried like custom objects.
- To handle static data that needs to be queried many times from the database.
- The application cache enables efficient access to custom settings, avoiding repeated queries to the database.
- Formula fields, validation rules, flows, Apex, and SOAP API can then use this data.
- Can be accessed via custom setting methods or using $Setup variable.
For More Information
- Sales Objects
- Object Relationships Overview
- Considerations for Relationships
- Understand Custom & Standard Objects
If you want to see more information about Salesforce, can go to Write Unit Tests for Apex in Salesforce.

Write Unit Tests for Apex in Salesforce
Write unit tests for Apex is important to make sure the code is working and produces the expected results. In this article we will learn to write unit tests methods for Apex classes, triggers, controllers, flows and processes in Salesforce.
Considerations to Write Unit Tests
- The test classes and methods must be annotated with @isTest statement and can be either private or public.
- This methods should be static, return no values and no parameters.
- Test data should be available to test functionality and data.
- Can use @testSetup to set up test data in your class method.
- The method being tested can be called directly from the test method.
- To test triggers, include DML operations in test methods.
- Test results can be verified with the System.assert() method.
Anatomy of an Apex Test Class
- 1sth line: @isTest Indicates that this Apex class is a test class.
- 4th line: @isSetup indicates that this method is used for creating test data.
- 9th line: @isTest indicates that this method is a test method.
- 10th line: The method should be static and void return, that means, it must not return any value. In addition, the method must not accept any arguments.
@isTest
private class MyApexClassTest {

  @isSetup
  private static void setupTestData() {
    //Create data to use in the test methods.
  }

  @isTest
  private static void myTestMethod() {
    //Test code here.
  }

}
Structure of Write Unit Tests
- Prepare valid Data for test.
- Execute the methods to be tested.
- Verify Results using assertions and make adjustments if it’s needed.
All unit tests follow the same structure to create test data. In addition, the data is not commited so it does not need to be deleted.
Best Practices When Write Unit Tests
- Make multiple test cases. For example, consider positive, negative and user-restricted code behavior.
- Unit tests should create their own test data to not depend on existing data in the org.
- No need to delete data because unit tests do not commit changes.
- Always verify results using System.assert().
- When the expected result does not match the actual by System.assert() an exception is thrown.
- Should test only one aspect of code at a time to make it easier to understand the purpose.
- Add your test to a test suite when a new bug is found to simplify regression testing.
- Test-driven development or creating unit tests before writing new code can help to understand how code will be used.
Code Coverage Computation
- Code coverage Percentage formula: CCP = (number of covered lines) / (number of covered lines + number of uncovered lines)
- Not counted and does not impact code coverage percentage: Comments, class name definition, lines that only contain brackets and System.debug statements.
Sample of Test for an Apex Trigger
//Trigger Class
trigger ContactTrigger on Contact (before insert) {
List <String> phoneNumbers = new List <String>();
List <Account> accountList = new List <Account>();
Map <String, Account> mapAccounts = new Map <String, Account>();
if (Trigger.isBefore && Trigger.isInsert) {
for (Contact c : Trigger.New) { phoneNumbers.add(c.PhoneNumber); }
accountList = [SELECT Id, MobilePhone FROM Account WHERE MobilePhone IN :phoneNumbers];
for (Account a : accountList) { mapAccounts.put(a.MobilePhone, a); }
if (mapAccounts.size() != 0) {
for (Contact c : Trigger.New) {
if (mapAccounts.containsKey(c.PhoneNumber)) {
c.AccountId = mapAccounts.get(c.PhoneNumber);
}
}
}
}
}
//Test Class
@isTest
private class ContactTriggerTest {

  @testSetup
  static void createTestData() {
    Account a = new Account(Name='Test Account', MobilePhone = '1234');
    insert a;
  }

  @isTest
  static void testMapping() {
    Contact cont = new Contact(LastName = 'Vallejos', PhoneNumber = '1234');
    insert cont;

    Account acc = [SELECT Id, Name FROM Account WHERE Name = 'Test Account' LIMIT 1];
    Contact cont2 = [SELECT Id, AccountId FROM Contact WHERE Id = :cont.Id];

    System.AssertEquals(acc.Id, cont2.AccountId);
  }
}
More Information
For more information about Salesforce can go to Ways to include Visualforce pages into Lightning Platform

The Test Framework in Salesforce
The Test Framework in Salesforce is important to make sure that our applications do not break functionality and works as expected.
After read this post you will learn to describe the main features and functionality of the test framework in Salesforce. In addition, the considerations and options available for running selected tests when deploying Apex components.
Why Test Framework in Salesforce?
- To ensure sucessful long-term development and that the application works as expected.
- Also, to ensure that any changes and extensions to an application do not break functionality.
- Is required to deploy a Salesforce application to customer.
Features of the Test Framework in Salesforce
- Write Unit Test for Apex classes and triggers.
- Run Unit Test or a bunch of running tests together.
- Check Test Results whether tests succeed or fail in the Developer Console.
- Generate Code Coverage for code every time a test is run.
Deployment Requirements
- Overall code coverage in an org must be 75% for successful deployment.
- Apex classes and triggers should be compiled successfully.
- Test classes and methods are not included from the code coverage requirement.
Unit Tests of Test Framework in Salesforce
- Are created and executed to help facilitate error-free code.
- Can test code on a single record as well as on multiple records.
- Allows to having a suite of regression tests to re-run every time code is updated.
- Test suites (collection of tests) can be created to execute multiple test classes.
- Built-in tools are provided to allow unit test execution and analysis.
- Includes support for loading test data from different sources.
- Are executed without throwing any uncaught or limit exceptions.
- Apex code executed in test methods are subject to governor limits.
- Code coverage is generated for Apex classes and triggers each time a test is run.
- All Apex trigger is required to have at least 1 line of code coverage.
- Parallel Apex Testing enables executing unit test in parallel and helps speed up run time.
Unit Test Limitations
- Cannot send outbound emails. Apex code that sends an email message runs successfully, but not email is actually sent out from the org.
- Unit tests cannot perform HTTP callouts. In order to test Apex callouts can use mock responses that are created by using the HttpCalloutMock interface.
Running Selected Tests
Selected tests is a testing option which allows a specifying the only test classes to execute.
- To clarify the coverage of some Apex code.
- The coverage is computed individually for each class and trigger and is different from the overall code coverage percentage.
- Running a subset of tests results to quicker test runs.
- Only for test classes, not for invididual test methods.
Test Options for Change Sets
To deploy code from Sandbox to Production we can use Change Sets. However, when we use it, four test options are available.
- Default: The default option in Production is run local tests. On the other side, in sandbox, no tests are executed.
- Run Local Test: Run all tests except Managed Package Tests.
- All Tests: Run all tests including Managed Package Tests.
- Specified Tests: Test classes to execute are specified in a list.
More Information about Test Framework in Salesforce
- What are Apex Unit Tests?
- What to Test in Apex
- Get Started withi Apex Unit Tests
- Choose Which Tests to Run in a Deployment
- Choose Test Options for Change Sets
- Running a Subset of Tests in a Deployment
- Code Coverage Best Practices
To learn more about Salesforce can go to Static and Instance in Apex Salesforce

Lightning Web Component in Salesforce
A Lightning Web Component in Salesforce is a framework to build custom components, using HTML and modern Javascript, to run efficiently and save resources in our apps.
Types of Lightning Web Component in Salesforce
- UI Component: Custom components that users can interact with via interfaces, buttons, forms, etc.
- Service Component (Library): Serves a helper library, however, is created to have variables or functions that can be shared between components.
Contents for Lightning Web Component in Salesforce
HTML File
- Every UI Component must have an HTML file.
- The root tag should be <template>.
- Convention name is <component>.html, for example, mainComponent.html.
- When a component renders, the <template> tag is replaced with the name of the component with “c” at the begining, as default namespace.
<!-- Code -->
<template>
  <h1>Hello World</h1>
</template>
<!-- Rendered -->
<c-main-component>
  <h1>Hello World</h1>
</c-main-component>
Javascript File
- A Javascript file is required in any type of Lightning Web Component.
- Follows the naming convention <component>.js, for example, mainComponent.js
- The class name must be written in Camel Case such as: class MainComponent.
- We can import a class, function or variable declared in a module using the import keyword.
- Javascript files in Lightning web components are ES6 or ES2015 (ECMAScript) modules.
- Every component that has UI must have the code below:
import {LightningElement} from 'lwc';
class MainComponent extends LightningElement {
  //code here
}

export default MainComponent;
- A custom component should extends the class LightningElement as the code above.
- The export default keywords allows to use this class by other components.
- A javascript file can contain: Private properties, event handlers and Public API (via public properties and methods using @api)
- Fields defined in a Lightning web component class are reactive. Meaning, if the value of a field changed in the controller, the component automatically rerenders.
- Use the decorator @track to detect any changes made to its properties or elements in an object or array.
Configuration File
- Configuration file is required for every component.
- Defines the metadata for the component. Also, includes the design configuration.
- Naming as <component>.js-meta.xsml. For example, mainComponent.js-meta.xml.
<?xml version="1.0" encoding="UTF-8"?>
<LightningComponentBundle xmlns="http://soap.sforce.com/2006/04/metada">
  <apiVersion>45.0</apiVersion>
  <isExposed>true</isExposed>
  <targets>
    <target>lightning__AppPage</target>
  </targets>
</LightningComponentBundle>
CSS File
- Name convention as <component>.css. For example, mainComponent.css.
- Uses standard CSS.
- Does not override other styles on other parts of a page, only scoped to the component.
- Only once CSS per Lightning web component.
- Custom Aura tokens are created to style Aura components and can be used as variables for css. (See the code example)
<!--- MyAuraTokens.tokens -->
<aura:tokens>
  <aura:token name="myBaseFontNames" value="Helvetica, Arial" />
  <aura:token name="myBaseFontColor" value="#222222" />
</aura:tokens>
/* myLightningWebComponent.css */
.bodyClass {
  font-family: var(--c-myBaseFontNames);
  color: var(--c-myBaseFontColor);
}
- Can create a Lightning Web Component that contains only a CSS and configuration file and, then imported by another Lightning Web Component that needs it.
- To import a CSS Module, use @import statement. For example: @import “c/mainComponent”
SVG Icon
- A custom icon can be defined for the custom component including an SVG file.
- It’s naming convention is <component>.svg such as mainComponent.svg.
- Only one SVG file is allowed per Lightning web component.
- The SVG file is added to the top-level component folder.
- SVG icon is visible in Lightning App Builder and Experience Builder.
Tests for Lightning Web Component in Salesforce
- Component tests for Lightning Web Component are run using Jest.
- Jest is a third-party testing framework used to test Javascript code.
- Create a folder __tests__ on the component folder to contain all the test files.
- The convention name recommended is <component>.test.js such as testMainComponent.test.js
- Jest tests are created locally and run independently of Salesforce.
Access to Resources from Lightning Web Component in Salesforce
- Static Resources can be imported using @salesforce/resourceUrl.
- Content Asset Files can be imported using @salesforce/contentAssetUrl.
- Custom Labels used for implementing multilingual features can be imported using @salesforce/label.
- In addition, can import Internationalization Properties using @salesforce/i18n scoped module.
- User Information can be imported using @salesforce/user.
- Form Factor of the device is accessed by importing @salesforce/client/formFactor.
//Using a static resource in lwc

import { LightningElement }
import staticGVallejos from "@salesforce/resourceUrl/gvallejosLWC";

class MainComponent extends LightningElement {
  imgGVallejos = staticGVallejos + "/gvallejosLWC/images/gVallejos.png";
}
Checking User Permissions in Lightning Web Component in Salesforce
- The scoped modules @salesforce/userPermissions and @salesforce/CustomPermission are used to check permissions in Lightning Web Component.
- To check a user permission:
import canCustomizeReports from '@salesforce/userPermission/CreateCustomizeReports';
- To check custom permissions:
//component.js
import { LightningElement } from 'lwc';
import hasViewGoogleSlides from '@salesforce/customPermission/ViewGoogleSlides';

export default class App extends LightningElement {
  get isViewButtonVisible () {
    return hasViewGoogleSlides;
  }
  openGoogleSlides(e) { ... }
}
<!-- component.html -->
<template>
  <template if:true={isViewButtonVisible}>
    <lightning-button label="View Content" onclick={openGoogleSlides}></lightning-button>
  </template>
</template>
Considerations When Using Lightning Web Component Model
- A Lightning Web Component cannot contain an Aura Component.
- In addition, the methods loadScript and loadStyle available through the platformResourceLoader module is used to load Javascript and CSS files respectively.
- Finally, unlike Aura Components, Javascript and CSS files referencing takes place in the controller instead of the template.
Learn More
- Introducing Lightning Web Component
- Define a Component
- Data Binding in a Template
- Component JavaScript File
- Configuration File Tags
- Create a CSS Style Sheet for a Component
- Access Static Resources, Labels, Internationalization Properties, User IDs, and Form Factors
If you want to learn more about Salesforce go to Lightning Component Framework

Ways to include Visualforce pages into Lightning Platform
Visualforce pages into Lightning Platform have several ways to be included in Salesforce. Do you want to know more about it?
When an organization has complex business processes which require unique UI and are not support by existing functionality, we can use Visualforce pages, that’s the importance of it.
Applications of Visualforce Pages into Lightning Platform
A Visualforce Page (VFP) can be incorporated into Force.com as tabs, home pages, page layouts, buttons, links, components, menu items, quick actions and pages.
Tabs
When creating a custom tab we are allow to embed Visualforce pages.
Go to Setup and search for “Tabs“. In the Visualforce Tabs section we are allow to create a new tab related a visualforce page.

In addition, we can override Tab home Pages. Overriding tabs only works when the Visualforce pages uses the standard list controller for that tab, that means, using custom controllers or no controller.
Page Layouts
We can embed visualforce pages into page layouts. However, that VFP should use the standard controller of the standard or custom object associated with the page layout.

Button or Link
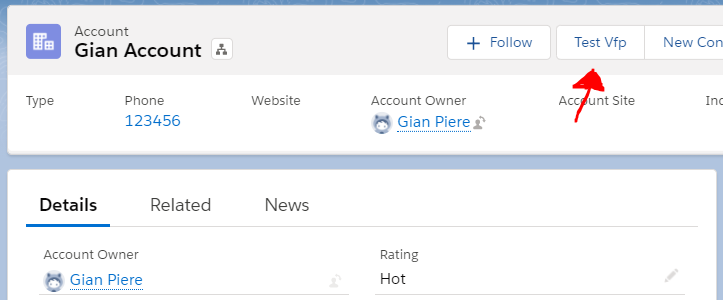
We can configure Buttons or links to launch Visualforce pages. Also, we can override buttons or actions in standard or custom objects.
To create a custom button for an standard object, go to the “Buttons, Links and Actions” section in the object and clic in “New Button or Link”, select the visualforce page option in Content Source and, finally, add it to the Object’s Layout from Mobile & Lightning Actions.

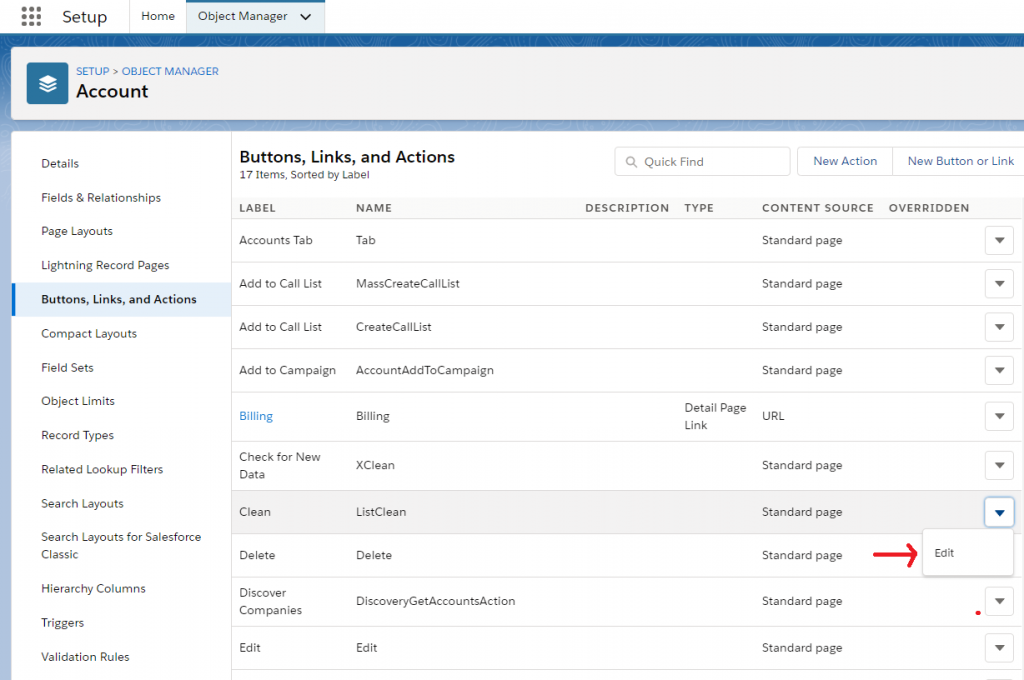
To replace a standard button, link or action. Go to that section in the object, select the button and clic in Edit and select as “override with” option your visualforce page.

Learn More
- Get Started with Visualforce
- Where Visualforce Pages Can Appear in the Salesforce Mobile App
- Customize Navigation
- Contenidos Web en Visualforce Pages: HTML, CSS y Javascript
To know more about Salesforce can go to The Lightning Component Framework

The Lightning Component Framework
The Lightning Component Framework is a UI framework that allows building single-page web apps with dynamic and responsive user interfaces in Salesforce.
Benefits of Using Lightning Component Framework
- Utilizes event-driven architecture. Therefore, components are capable of listening and response events.
- Can build responsive applications.
- Uses Javascript on the client side and Apex on the server side.
- Utilizes a stateful client and a stateless server. It means, it calls the server only when is necessary incresing the effience of the app.
- Can use Aura or Lightning Web Components to build components that coexist and interoperate on a page.
- Can use in different context. For example, can be used in Custom Tabs, Lightning Experience and the Salesforce mobile app.
- Components are reusable and reduce time development.
Event-Driven in Lightning Component Framework
- Utilizes event-driven architecture which consists of event procedures, event consumers, and channels.
- To handle information in real time when an event occurs.
- Simplifies communication by decoupled event producers from event consumers.
- A component can subscribe to an application event or a visible component event.
Built-in Apps
- Theres a wide range of built-in components to build apps quickly.
- Can be responsive.
- Can be use in different devices without problems.
- Also, can build reusable components building blocks and accelerate app development.
- Can customize applications and components using the Salesforce Design Guidelines call Lightning System Design.
Multiple Uses Cases
- Components can be accessed from the navigation menu in the Salesforce Mobile App.
- In addition, Lightning components can be added to Visualforce Pages usign the <apex:includeLightning /> component.
- We can publish components on the Appexchange and shared with others.
- Standard and custom components can be added to Lightning Pages using the Lightning App Builder.
- Finally, we can use Experience Builder to add componentes in a community.
Increased Performance
- Lightning components runs on stateful and stateless architecture to use resources efficiently.
- Increses efficiency by utilizing server, browser, devices and network intelligently.
- Use Javascript on the client side to manage UI component metadata and data.
- Client calls the server or only sends requests to it only when necessary.
- Server only sends the data that is needed by the client.
- Can use JSON format to exhange data between client and server.
More Information
- What is Salesforce Lightning?
- Why Use the Lightning Component Framework?
- Event-Driven Software Architecture
- Why Use the Aura Components Programming Model?
- Trailhead – Use Lightning Components in Lightning Experience
For more Salesforce information: Static and Instance in Apex Salesforce

Static and Instance in Apex Salesforce
If you are a Salesforce developer, you need to know everything about static and instance in Apex Salesforce to code as a pro with good programming principles.
In apex classes can’t be static. Nonetheless, we can have static methods, variables and initialization code. Also we can have instance methods, member variables and initialization code, which have no modifier, and local variables.
Static Characteristics in Apex
Static methods, variables and initialization code could be:
- Associated with a class.
- Only in outer classes.
- Only when a class is loaded.
- No transmitted as part of the view state for a Visualforce page.
Instance Characteristics in Apex
Instance methods, member variables, and initialization code could be:
- Associated with a particular object.
- No definition modifier.
- Created with every object instantied from the class declared.
Using Static Methods and Variables
- Only with outer classes. That means, classes that can have inner classes.
- Doesn’t require an instance of the class in order to run.
- All static variables are initialized before an object of a class is created.
- A static method is used as a utility method. For example, when we need to access to raw data without make an object declaration.
- A static variable is static only within the scope of the Apex transaction. Can be used as a flags in Apex Triggers.
- A static variable or method can’t be accessed through an instance of that class.
- An inner class behaves like a static class and doesn’t require the static keyword. Those classes doesn’t need to be declared.
- In other words, use static methods and variables when you don’t need the abstraction of an object but straight code.
- Ask yourself “Does it make sense to call this method, even if no object has been constructed yet?” If so, it should definitely be static.
public class P {
   public static boolean firstRun = true;
}
trigger T1 on Account (before delete, after delete, after undelete) {
  if(Trigger.isBefore){
    if(Trigger.isDelete){
        if(p.firstRun){
            Trigger.old[0].addError('Before Account Delete Error');
            p.firstRun=false;
        }
      }
  }
}
Using Instance Methods and Variables
- Are used by instance of a class, that is, by an object.
- Instance member variable is declared inside a class.
- Usually use instance member variables to affect the behavior of the method.
- In other words, use it when depends of an object and could affect their behaviour. For example, a Point, need an instance of x and y to be created.
public class Plotter {

    // This inner class manages the points
    class Point {
        Double x;
        Double y;

        Point(Double x, Double y) {
             this.x = x;
             this.y = y;
        }
        Double getXCoordinate() {
             return x;
        }

        Double getYCoordinate() {
             return y;
        }
    }

    List<Point> points = new List<Point>();

    public void plot(Double x, Double y) {
        points.add(new Point(x, y));
    }

    // The following method takes the list of points and does something with them
    public void render() {
    }
}
References
- Static and Instance Methods, Variables, and Initialization Code – Apex developer Guide
- When to use static methods – Stackoverflow
- Static and Instance in Apex Salesforce – Salesforce Learning Point
To learn more about Salesforce can see: Contenidos Web en Visualforce Pages

Contenidos web en Visualforce Pages
Existen diferentes tipos de contenidos web en visualforce pages de Salesforce como HTML, CSS, javascript, mapas y frames. A continuación vamos a entender cuáles son y cómo se utilizan.
Tipos de Contenidos Web en Visualforce
Los tipos de contenido web que pueden ser usados en Visualforce Pages son: HTML, CSS, JAVASCRIPT, IFRAMES y MAPS.
HTML
- Se puede utilizar el código HTML regular en Visualforce pages. Por Ejemplo: <html>, <body>, <head> y <h1>.
- Además, podemos generar automáticamente las etiquetas HTML en Visualforce.
- Se pueden anular las etiquetas HTML.
- Por último, se puede incluir CSS en línea dentro de las etiquetas HTML.
CSS
- Pueden utilizarse mediante la etiqueta <apex:stylesheet>.
- Podemos utilizar código css llamando a la variable $Resource. Por ejemplo: <apex:stylesheet value=”{!$Resource.customStyleSheet}” />
- Así mismo, el atributo styleClass define las clases de estilo en las etiquetas. Por ejemplo: <apex:outputPanel styleClass=”dataTable”>
- El atributo style permite configurar los estilos directamente. Por Ejemplo: <p style=”margin: 5px;”>
Javascript
- Javascript puede ser incluido utilizando <apex:includescript>. Por ejemplo: <apex:includescript value=”{!$Resource.JavascriptFile}” />
- La etiqueta <script> puede ser utilizada para acceder a funciones de javascript.
- Se pueden utilizar las variables $Resource para acceder a los archivos de javascript.
- Debemos subir como recursos estáticos los archivos javascript a utilizar.
Mapas e Iframes
- Para mostrar mapas se puede utilizar el componente <apex:map>
- Además, se pueden utilizar marcadores con la etiqueta <apex:mapMarker>
- Para mostrar páginas web externas se pueden utilizar iframes con la etiqueta <apex:iframe>. Por ejemplo: <apex:iframe src=”https:://www.wikipedia.org” />
Recursos Estáticos (Static Resources)
- Son utilizados para almacenar archivos y ser referenciados en Visualforce pages.
- Pueden incluir imágenes, stylesheets, javascript y librerias.
Finalmente, para saber más sobre contenidos web en visualforce de Salesforce:
- Manually Override Automatic <html> and <body> Tag Generation
- Trailhead – Create & Edit Visualforce Pages
- Extending Salesforce Styles with Stylesheets
- Using Custom Styles
- Using Javascript in Salesforce
- Visualforce Developer Guide – apex:iframe
- Creating Maps with Visualforce
Si quieres saber más sobre Salesforce puedes ir a:

Controladores de una Visualforce Page
Los Controladores de una Visualforce Page son la parte lógica que debemos conocer para crear y manejar aplicaciones de calidad.
Tipos de Controladores
Controladores Estándar
- Los controladores estándar son utilizados para gestionar objetos personalizados y por defecto.
- Contiene la funcionalidad y la lógica utilizada por las páginas estándar de Salesforce (standard Salesforce pages).
- Se incluyen en la etiqueta apex:page de la siguiente manera: <apex:page standardController=”Account”>
- Se pueden acceder a sus valores mediante force.com API como {! Account.Name }
<!-- Visualforce Page Example -->
<apex:page standardController="Account">
  Name: {! Account.Name }
</apex:page>
Controladores Personalizados
- Pueden ser utilizados para sobrescribir funcionalidad, navegación y llamadas a web services.
- Utiliza su constructor por defecto, sin argumentos, es decir, sin parámetros.
- Los métodos de un controlador estándar pueden ser getters, setters y acciones.
//MyCustom Controller
public class MyCustomController {
    Account acc;

    public MyCustomController () {
      acc = [SELECT Id, Name FROM Account
               WHERE Id =: ApexPages.currentPage().getParameters().get('id')];
    }

    public Account getAccount () {
      return acc;
    }
}
<!-- Visualforce page -->
<apex:page controller="MyCustomController">
  <apex:pageBlock>
    <apex:pageBlockSection>
      <apex:pageBlockTable value="{! account }" var="acc">
        <apex:column value="{! acc.Id }" />
        <apex:column value="{! acc.Name }"/>
      </apex:pageBlockTable>
    </apex:pageBlockSection>
  </apex:pageBlock>
</apex:page>
Métodos Getter
- Cada valor calculado y por mostrar en una visualforce page debe tener un método getter en el controlador.
- Los nombre de los métodos getter deben tener siempre el prefijo get en el inicio. Por ejemplo: getAccounts.
- Con el markup {! nombre_de_expresion } se puede conectar automáticamente una visualforce page con el método getter. Por Ejemplo: {! accounts } se conecta con el método getter getAccounts.
- Los métodos getter no tienen parámetros pero si deben retornar un objeto.
- Deben tener por lo menos un nivel de acceso público (Public access level).
- Un método getter es requerido para acceder a los datos de un objeto desde un controlador a una visualforce page.
- Un método getter puede obtener datos utilizando consultas SOQL.
//Getter example code
public class MyCustomController {
  Account acc;

  public Account getAccount () {
    return acc;
  }
}
Métodos Setter
- Son utilizados para enviar datos desde una visualforce page hacia el controlador.
- Los métodos setter no son requeridos.
- Estos métodos son ejecutados automáticamente antes de los métodos acciones.
- Su nombre deben empezar con el prefijo set. Por ejemplo: setVariable, el valor de variable debe ser obtenido desde una visualforce page.
- Deben tener por lo menos un nivel de acceso público.
- El método setter tiene un parámetro y no retorna ningún valor.
//Setter example code
public class MyCustomController {
  Account acc;
  String accountName;

  public Account getAccount () {
    acc = [SELECT Id, Name FROM Account
              WHERE Id =: ApexPages.currentPage().getParameters().get('id')];
    return acc;
  }

  public String getAccountName () {
    return accountName;
  }
  //Setter Method
  public void setAccountName(String value) {
    accountName = value;
  }

  public PageReference save () {
    acc.Name = accountName;
    update acc;
    return null;
  }
}
<!-- Setter visualforce page example -->
<apex:page controller="MyCustomController">
  <apex:form>
    <apex:outputLabel value="Enter account: " />
    <apex:inputText value="{!accountName}" />
    <apex:commandButton value="Save" action="{!Save}" /> <p/>
    <apex:outputText value="Account Name entered: {!accountName}" />
  </apex:form>
</apex:page>
Propiedades para utilizar métodos Getter y Setter
- Podemos representar un método get y set con los sentencias get y set. Por ejemplo: public dataType propertyName {get; set;}
- Si una propiedad tiene una única sentencia get, es de sólo lectura.
- Si una propiedad tiene una única sentencia set, es de sólo escritura.
- Las propiedades con sentencias get y set son consideradas de lectura y escritura.
public class MyCustomController {

  public Account acc {get; set;}

  public String accountName {get; set;}

  public String accountPhoneNumber {get;}

  public String accountFile {set;}

}
Extensiones de Controladores
Las extensiones de controladores son clases en Apex que pueden extender la funcionalidad de controladores estándares o personalizados.
- Podemos llamar a una extensión de controladores utilizando la palabra clave extension en la etiqueta <apex:page> de nuestra visualforce page.
- Se pueden utilizar múltiples extensiones de controladores en una visualforce page separándolos por comas.
- Deben tener un constructor con un sólo argumento del tipo ApexPages.StandardController para inicializar sus valores.
public class MyControllerExtension {

  private final Account acc;

  public MyControllerExtension(ApexPages.StandardController stdController) {
    this.acc = (Account)stdController.getRecord();
  }

  public String getGreeting () {
    return 'This is a greeting message for: ' + this.acc.Name;
  }

}
<apex:page standardController="Account" extensions="MyControllerExtension">
  <h2>{!greeting}</h2>
  <p>
    <apex:form>
      <p><apex:inputField value="{!account.name}"/></p>
      <apex:commandButton value="Save" action="{!save}"/>
    </apex:form>
  </p>
</apex:page>

Para saber más sobre Controladores, Getters y Setters puedes ir a:
Para saber más sobre Salesforce:

Todo lo que deberías saber sobre Excepciones de Apex en Salesforce
¿Por qué usar excepciones?
Las excepciones son causadas por errores encontrados cuando ejecutamos código que interrumpe su flujo normal de ejecución.
Se utilizan para recuperarse de los errores, gestionarlos y asegurarnos de una apropiada ejecución del código.
Tipos de Excepciones
Excepciones Nativas:
- Apex ofrece un framework nativo para gestionar excepciones por default.
- Suceden cuando se interrumpe el flujo del programa automáticamente por el sistema.
- Pueden haber múltiples bloques “Catch”. Sin embargo, la excepción genérica debe ser la última.
- El bloque Finally es ejecutado cuando la excepción sucede o no. Además, se utiliza regularmente para hacer limpieza de variables o código.

Excepciones Personalizadas:
- Para interrumpir el flujo del programa y gestionar los errores en cualquier parte del código.
- Para manejar excepciones de manera más detallada.
- Para crear una excepción personalizada se debe extender a la clase “Exception”.
- El nombre de nuestra clase personalizada debe terminar con la palabra “Exception”. Por ejemplo: “PurchaseException” o “CustomException”.

Métodos de Excepciones:
Métodos Comunes
- getTypeName(): Devuelve el tipo de excepción.
- getMessage(): Para obtener el mensaje del error.
- getCause(): Devuelve la causa de la excepción.
- getLineNumber(): Para devolver la línea en donde ocurre la excepción.
Otros Métodos
- getDmlFieldNames: Nombre de los campos que causan el error.
- getDmlId: Id de los registros fallidos que causan el error.
- getDmlMessage: El error del mensaje por un registro fallido específico.
- getNumDml: Devuelve el número de registros fallidos.
Consideraciones sobre Excepciones
Excepciones Gestionables:
- addError(): Para revertir DML operaciones y retornar el error en un trigger.
- ApexPages.message(msg): Para mostrar los errores en un visualforce page.
- Clase “Messaging”: Para devolver errores vía e-mail.
Excepciones no Gestionables:
- LimitExceptions no pueden ser manejables.
- Los errores de Assertion no pueden ser gestionables.

¿Alguna vez te has preguntado si realmente estás innovando?
¿Los proyectos en los que participamos son realmente innovadores? Comencemos por responder la siguiente pregunta: ¿Qué es la innovación?
Según el libro “Como trabaja Google” de Schmidt y Rosenberg: “La innovación abarca tanto la producción como la implementación de ideas novedosas y útiles”.
Con novedoso se refiere a crear una nueva funcionalidad que sea sorprendente, por lo tanto, no solamente en responder a la necesidad de un cliente o usuario.
Por otro lado, esta idea debe ser radicalmente útil, es decir, no basta con resolver pequeñas necesidades.
En otras palabras, para que algo sea innovador, según los autores mencionados, nuestra idea debe ser “Nueva, sorprendente y radicalmente útil“.
Entonces, ¿Tu proyecto es realmente innovador?¿Qué necesitas para que sea nuevo, sorprendente y muy útil? Compártelo en los comentarios.
Fuente: Cómo trabaja google – Eric Schmidt & Jonathan Rosenberg.

¿Qué es la arquitectura MVC en Salesforce?
¿Sabías que conociendo los elementos que componen la arquitectura MVC en Salesforce puedes programar mejor en esta plataforma?
MVC es un patrón de arquitectura de software que divide los datos de una aplicación en capas según su estructura (Modelo), lógica (Controlador) y forma de presentación de datos (Vista).
Los elementos de Salesforce se pueden clasificar en las diferentes capas de la arquitectura MVC de la siguiente manera:
Modelo:
- Objetos estándares y personalizados.
- Campos de objetos.
- Relaciones de objetos o Lookups.
- Clases en Apex para representar datos.
Vista:
- Páginas estándar.
- Visualforce Pages.
- Componentes.
- Layouts y Tabs.
Controlador:
- Controladores estándar y personalizados con Apex.
- Herencia (Extends)
- Reglas y Herramientas declarativas: Validation Rules, Flows, Triggers, Process, etc.
Teniendo en cuenta los elementos que componen cada capa de la arquitectura MVC en Salesforce, podemos incrementar nuestro conocimiento para desarrollar en esta plataforma, sobre todo al empezar. ¿Cuál es tu opinión sobre este tema?

Aplicación para saber cuántos casos de COVID-19 hay en tu país – Salesforce lwc con Javascript
Aprende a crear una aplicación en Salesforce con javascript para ver cuántos casos de Covid-19 hay en Perú diariamente. ¿Te animas a programarla?

Consejos para ser un MEJOR DESARROLLADOR de SOFTWARE
Si sienten que no están creciendo como Desarrolladores de Software o recién están empezando en este ámbito. Aquí les comparto algunos consejos para mejorar como programadores:
- Practicar diariamente.
- Hacer Programación Competitiva.
- Escribir código legible.
- Adaptarse a los cambios.
- Trabajar en habilidades blandas y sociales.
Para profundizar en estos puntos mira el siguiente video:

¿Cómo ganar dinero como desarrollador de software?
Si estas iniciando en el mundo del desarrollo de software y quieres empezar a generar dinero debes ver este video.

5 cosas que desearía haber aprendido como estudiante de informática
Aquí les comparto cinco cosas que desearía haber aprendido cuando era estudiante de Informática. ¿Qué te parecieron estos puntos?¿Que te gustaría haber aprendido cuando eras estudiante?

Crea un Lightning Web Component en 5 minutos – Salesforce
Si estas empezando en el mundo de los Lightning Web Components, aquí te enseño cómo hacer un componente de Salesforce en 5 minutos.

Aprende a programar en Salesforce desde VsCode para trabajar productivamente (Video)
Cuando empezamos a programar en proyectos más grandes de Salesforce se nos dificulta desenvolvernos eficientemente desde el Developer Console. Por eso aquí les enseño cómo programar en Salesforce desde VsCode para trabajar productivamente.

Cómo Resolver el Bad Request Error en CPQ Generador de Documentos en Salesforce
Si usas CPQ para generar documentos en Salesforce, entonces, alguna vez debes haberte encontrado con el error Bad Request. A continuación, veremos las frecuentes razones por las que se produce este error y veremos cómo resolver Bad Request error en CPQ generador de documentos de Salesforce.
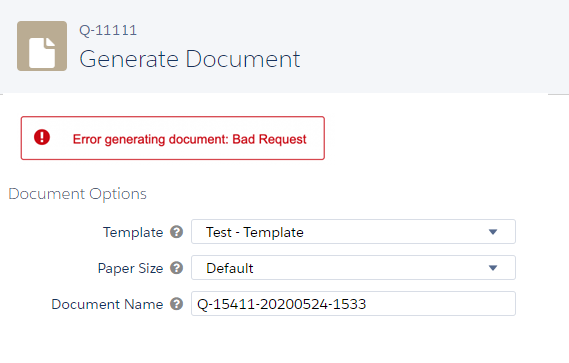
Las frecuentes razones por las que aparece este error es por:
- Typos o errores tipográficos y de sintáxis.
- Conflictos con Imágenes.
- Cantidad de caracteres o número de páginas por documento.
Typos
Los errores tipográficos o de sintáxis pueden estar relacionado a los siguientes puntos:
- Para CPQ, debemos utilizar los tags XSL:FO y no HTML.
- En visualforce pages que renderizen CPQ, debemos utilizar HTML Codes en lugar de caracteres especiales. Por ejemplo: En lugar de usar &, debemos utilizar &amp; y derivados.
Conflictos de Imágenes
Usualmente podemos hacer uso de imágenes que no son más accesibles o cuyo URL no existe. Debemos asegurarnos de usar correctamente las imágenes que generará nuestro documento.
Tamaño del Documento
La documentación de CPQ no tiene una documentación clara respecto a este punto. No obstante, en una ocasión, me apareció este error cuando generaba un documento de más de 100 páginas.
Haciendo un cálculo aproximado, CPQ document nos permite generar 100 páginas, incluyendo 20 palabras por cada 50 líneas. Teniendo una limitación aproximada de (20 * 50 * 100) = 1000000 caracteres por documento.
Si bien es incierto y complicado llegar a la fuente puntual de este error. Recomiendo, en un sanbox, clonar el quote template que estamos renderizando e ir agregando cada sección. Así, detectaremos el área del documento en la que estamos fallando y podemos centrarnos en resolver el conflicto de mejor manera.
¿Te han sido útiles estos puntos? ¿Alguna vez te has topado con un error que genere Bad Request y que no este mencionado en este artículo? Si es así, compártelo en los comentarios.

Escribir Unit Tests para Apex en Salesforce
Escribir unit tests en Apex es importante para asegurarse que el código funciona y produce el resultado esperado. En este artículo, vamos a aprender escribir pruebas unitarias para Apex classes, triggers, controladores, flujos y procesos en Salesforce.
Consideraciones para Escribir Unit Tests
- Las clases y métodos de prueba deben crearse con la etiqueta @isTest y pueden ser privados o públicos.
- Estos métodos deben ser estáticos, no devolver valores y tampoco parámetros.
- Los datos de test deben estar disponibles para probar la funcionalidad y los datos.
- Se puede usar @testSetup para configurar datos de prueba en la clase de método.
- El método que se está probando puede ser llamado directamente desde el método de prueba.
- Para testear triggers, se deben incluir operaciones DML en los métodos de prueba.
- Los resultados del test se pueden verificar con el método System.assert().
Anatomía de una clase de prueba en Apex
- 1° línea: @isTest indica que esta clase de Apex es una clase de prueba.
- 4° línea: @isSetup indica que este método se utiliza para crear datos de prueba.
- 9° linea: @isTest indica que este método es un método de prueba.
- 10° línea: El método debe ser estático y del tipo void, es decir, no debe devolver ningún valor. Además, el método no debe aceptar ningún argumento.
@isTest
private class MyApexClassTest {

  @isSetup
  private static void setupTestData() {
    //Create data to use in the test methods.
  }

  @isTest
  private static void myTestMethod() {
    //Test code here.
  }

}
Estructura para Escribir Unit Tests
- Preparar datos válidos para tests.
- Ejecutar los métodos que serán probados.
- Verificar los resultados utilizando afirmaciones y realizando ajustes si es necesario.
Todas las pruebas unitarias siguen la misma estructura para crear datos de prueba. Además, los datos no se comprometen, por lo que no es necesario eliminarlos.
Mejores prácticas al escribir Unit Tests
- Realizar varios casos de prueba. Por ejemplo, considerar el comportamiento del código positivo, negativo y restringido por el usuario.
- Los test unitarios deben crear sus propios datos de prueba para no depender de los datos existentes en la organización.
- No es necesario eliminar datos porque las pruebas unitarias no hacen commit a los cambios.
- Siempre verificar los resultados usando System.assert().
- Cuando el resultado esperado no coincide con el actual de System.assert(), se lanza una excepción.
- Debe probar solo un aspecto del código a la vez para facilitar la comprensión del propósito.
- Agregue la prueba a un conjunto de pruebas (test suite) cuando se encuentre un nuevo error para simplificar las pruebas de regresión.
- El Test-driven basado en pruebas o la creación de pruebas unitarias antes de escribir un nuevo código pueden ayudar a comprender cómo se utilizará el código.
Cálculo de cobertura de código
- Fórmula para calcular la cobertura de código en porcentajes: CCP (número de líneas cubiertas) / (número de líneas cubiertas + número de líneas no cubiertas)
- No se cuentan y no afectan al porcentaje de cobertura del código: comentarios, nombres de clase, líneas que solo contienen llaves y declaraciones System.debug.
Muestra de prueba para Triggers en Apex
//Trigger Class
trigger ContactTrigger on Contact (before insert) {
List <String> phoneNumbers = new List <String>();
List <Account> accountList = new List <Account>();
Map <String, Account> mapAccounts = new Map <String, Account>();
if (Trigger.isBefore && Trigger.isInsert) {
for (Contact c : Trigger.New) { phoneNumbers.add(c.PhoneNumber); }
accountList = [SELECT Id, MobilePhone FROM Account WHERE MobilePhone IN :phoneNumbers];
for (Account a : accountList) { mapAccounts.put(a.MobilePhone, a); }
if (mapAccounts.size() != 0) {
for (Contact c : Trigger.New) {
if (mapAccounts.containsKey(c.PhoneNumber)) {
c.AccountId = mapAccounts.get(c.PhoneNumber);
}
}
}
}
}
//Test Class
@isTest
private class ContactTriggerTest {

  @testSetup
  static void createTestData() {
    Account a = new Account(Name='Test Account', MobilePhone = '1234');
    insert a;
  }

  @isTest
  static void testMapping() {
    Contact cont = new Contact(LastName = 'Vallejos', PhoneNumber = '1234');
    insert cont;

    Account acc = [SELECT Id, Name FROM Account WHERE Name = 'Test Account' LIMIT 1];
    Contact cont2 = [SELECT Id, AccountId FROM Contact WHERE Id = :cont.Id];

    System.AssertEquals(acc.Id, cont2.AccountId);
  }
}
Más información
Para más información sobre Salesforce puede visitar El Framework para Pruebas de Salesforce.